OS X Backup System
Most people around me know that I’m a total Mac geek… So I get that question a lot: “how do you back up your stuff?”
I heard that saying once: “They’re two kinds of people: those who lost all their data before… and those who will.”
Sure enough, I had my little traumatic experience before. Not a disaster (because I had some sort of backup system in place) but painful enough to realize how inadequate my system was at the time. Since then I know that a good backup system should let you get back to work within 2 minutes of a drive failure and let you recover any client’s job even if your office burns down.
Before we begin, I need to mention that although the strategy is system independent, the implementation I’m describing here is Mac OS X specific. Also, this will work best for a web designers, graphic designers, etc… If you do audio, video, or any type of work that requires huge files, the online storage might be a little trickier.
OS X Backup Strategy Overview
Once you got this system running, you’ll have an exact copy (aka. “mirror”) of your main drive, and copy of all your important data backed up to a remote location. Both updated automatically nightly.
Step 01: Local mirror of your main drive
Basically, you need to install an internal hard drive in you Mac just for that purpose. It should cost you around $75 online as of this writing (I like OWC). And get Super Duper! (less than $30) to do the nightly automatic mirror. I test my mirror drive about once a week and it’s been flawless (so far, 9 months). And once it copies the whole thing the first time, after that it just updates the modified elements and takes about 20 mn tops. If you keep all your jobs in your Documents folder like you should, then you also get a copy of those if you erase something by accident.
Step 02: Remote mirror of your “Documents” folder
Ideally, you should keep everything in your Documents folder. That’s what I do, besides for the websites I build that I keep in (surprise…) my Sites folder. I backup my Documents and Sites folders. You’ll have to tweak some of the examples below to fit your workflow.
The first thing you need is a decent online storage account. They’re about a million of them, so I’ll let you decide for yourself. The only advice I’ll give you is: don’t consider price as your main decision factor. This is not where you should save money, it’s too important. I use Strongspace and I’ve been very happy with it. Whichever online solution you pick, make sure it offers SSH access. If you don’t know what that means, just ask them: “Do you offer SSH access?”
Now comes the geeky (aka. free) part… The basic idea is to use SSH, rsync, and cron, to synch folders from your hard drive to your online backup. Those are all Unix tools that are part of OS X and you interact with them via the Terminal. SSH allows you to connect to your online storage, rsync is the program that does the actual backup, and cron is the program that schedules the backups daily. It can be intimidating if you’re allergic to the Terminal but it’s really easy if you follow these steps.
Set up a SSH key
When you connect to your online storage via SSH, it will ask you for your password, but you won’t be the one connecting via SSH, your backup program will. So we setup this key which is like an ID card for your computer to be recognized by the backup server. I already wrote about how to setup a SSH key there.
Test your rsync backup command and SSH key
We’re going to backup the Documents folder via rsync and make sure everything is fine. Open the Terminal (in your Applications folder) and type the following:
rsync -rltz ~/Documents/ user_name@storage_space.com:/home/user_name/backup/Documents/
rsync starts the rsync program, the -rltz letters are called flags and they tell rsync to backup stuff recursively (r), don’t copy the files aliases point to but just the aliases themselves (l), preserve time stamp on files (t), compress file data before transfer so that it uploads faster (z), the rest is the path to the source directory and then the destination directory. For the destination directory: user_name should be replaced by your actual user name of course, as well as storage_space.com and the path /home/user_name/backup/Documents/ most likely you’ll have to use something similar but with your own user name. The /backup/Documents/ part could be anything you want, wherever you want to backup your stuff in your online account. You could add the -v flag (the whole command would look like: rsync -rltzv) so you get feedback from rsync as it’s working. You can also do a “dry run” by adding the -n flag. This will tell rsync to only report the actions it would have taken and not perform any file transfers. Finally, you can monitor your upload/download speed with something like menumeters to make sure everything moving along. Depending on your connection speed and the size of your Documents folder, this could take a few hours or a couple days… But next time, rsync won’t upload the whole thing, it will check for changes and modify only what it needs to so all subsequent backups will be super fast. You could also just backup a small folder first to make sure it works. Something like:
rsync -rltz ~/Documents/test_folder/ user_name@storage_space.com:/home/user_name/backup/Documents
Automate the process
We could use the Terminal to setup the cron jobs, if you want it to start at 4 AM every night, it would look something like:
0 4 * * 1-7 rsync -rltz ~/Documents/ user_name@storage_space.com:/home/user_name/backup/Documents/
But there’s a nice free cocoa wrapper available that makes is even faster to setup, and I like the fact that you can just click a check box to disable/enable any cron job you have saved in there. It’s called CronniX and available for download there.
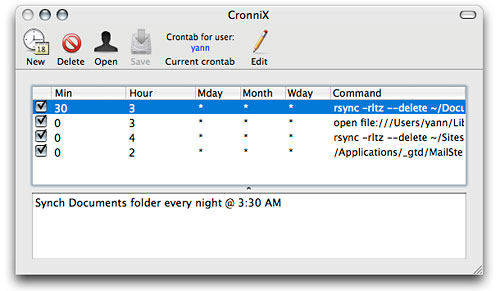
Automatize your daily backup with Cronnix
One last thing. If you want to have old files deleted online as you delete them on your computer add --delete to the rsync command:
rsync -rltz --delete ~/Documents/ user_name@storage_space.com:/home/user_name/backup/Documents/
Step 03: Done!
Now you got a perfect copy of your main drive so you can reboot in no time if something happens, and you have a duplicate of all your important files online in a secure location. The final cost is about $100 to setup (around $75 for the Hard Drive and $30 for SuperDuper!) + online storage space. And once the setup is done, you only need to check the system integrity once in a while. It pretty much does its thing on its own.
It works great for me, but it took me a little while to put all the pieces together. I hope this will help people in the same situation.