Remote TextMate Projects
You want to know the easy way to use TextMate’s Projects with files located on a remote server? Read on…
The Problem
TextMate is by far my favorite text editor for OS X, but the fact that its Projects view (and all its associated features) doesn’t work with files located on a remote server can be pretty frustrating when you’re working on a website. It goes something like this: you fire up Transmit (or similar FTP program), highlight the files you need to work on, and hit the ⌘+↓ key combo to open them. Now you got 30 windows littering your screen, you open a blank Project and start adding each file to its empty Project drawer while thinking that maybe you should just use BBEdit on that one…
Some Alternatives
There are a few different ways to deal with this problem. The first one is to develop locally and then upload to the live server. That’s the easiest solution, and what I do whenever I can. But sometimes, it’s just not practical. A semi-automated way to achieve similar results is to use Interarchy and its “NetDisk” feature. Not a bad solution but you have to buy Interarchy and it’s still a local → server synchronization process, not real live editing on the server.
At the other end of the spectrum, there’s Subversion. It’s the most elegant way to deal with the problem, but it’s not available on all servers and it’s a slightly overblown solution if you just need to perform random updates on a site you’re the only one working on.
The Solution
Update: the solution just got even better thanks to Jan’s tip.
A simpler yet powerful solution, which -requires only minimal use of the Terminal and- takes about 2 minutes to setup, is to get the remote server to mount directly in the Finder and trick TextMate into thinking it’s a local directory.
The only requirement to get this working is to have SSH access to the server.
How To
- Download and install MacFUSE (will require a restart)
- Download and install MacFusion (the 1.0 release has a bug in its Keychain password implementation, download the 1.01 Beta Release instead unless a newer version is out by the time you read this)
Setup a SSH Key pair for automatic authentication- Enjoy… You’re done!
MacFUSE is needed to use MacFusion. MacFusion is a menubar item that lets you mount remote volumes in the Finder. It works with SSH or FTP, allows you to create Favorites, and saves your passwords in your Keychain. Life is beautiful…
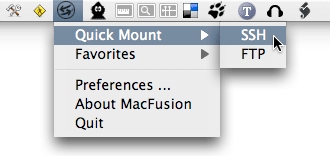
Easy access to your servers from the menubar
Just enter your server info like you would in any FTP application, click on “OK” and your server will show up in the Finder like a regular local network volume. That’s it! Now you can open multiple files as Projects (and save them) on any server via SSH or FTP. TextMate will treat them just like any other local Projects. And thus, the only TextMate annoyance I ever came across vanishes…
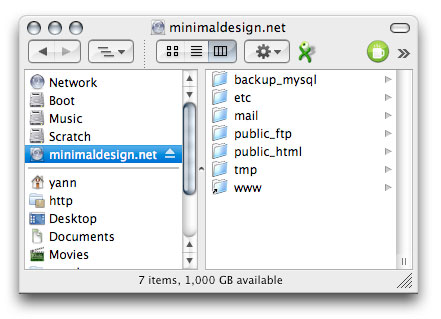
Your server… in the Finder!
One last note: TextMate leaves invisible files all over the place (more info at the bottom of the Saving Files section of the TextMate manual) which might make some people unhappy if you’re working on their server. So it might be a good idea to turn off this feature by running this command in the Terminal:
defaults write com.macromates.textmate OakDocumentDisableFSMetaData 1
Optional: Set Up SSH Authentication
MacFusion supports SSH authentication which is more secure than password authentication, and I like the fact that you just copy your public key to all your servers, no need to set any passwords in MacFusion. It’s slightly geeky, but actually really easy and completely optional. Here’s what you do:
Open up the Terminal and type: ssh-keygen -d
Hit enter 3 times to get to a prompt that will read something like:
The key fingerprint is: 33:3c:5d:41:97:1b:fc:f5:9f:69:54:2e:0b:f1:24:7f
Once that’s done, you’ll have an invisible folder in your User account. To view it, use the Finder’s Go → Go to Folder menu item (“⇧+⌘+G” shortcut). Type in: ~/.ssh/ and you should see something similar to that:
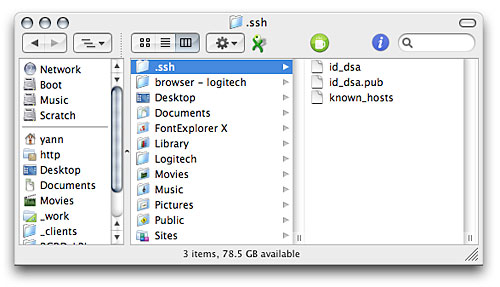
Your public key will be in this invisible .ssh folder
Almost done! Now you have to copy the content of your public key file id_dsa.pub into a file called authorized_keys2 on the server. This authorized_keys2 file needs to be in a folder called .ssh (with the dot) at the root of your account. You can do that with a fancy Terminal command line like:
scp ~/.ssh/id_dsa.pub www.your_site.com:.ssh/authorized_keys2
Or, if like me you enjoy the feel of your mighty mouse clicks, just create the file via FTP and copy paste the content. If you use TextMate to do so, you won’t have any problems. And if the .ssh folder doesn’t exist, you can create it yourself. Just make sure the “show invisible files” option is turned on in your FTP program. You can copy your public key file to as many servers as you like to get access to each one of them.
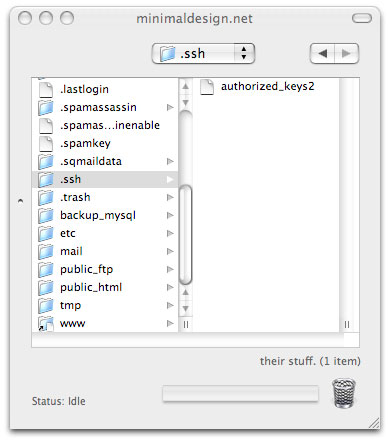
You can create your own .ssh folder if needed
Now that you got your private key setup on your Mac and your public key copied on your server, just setup MacFusion to use your SSH public key.
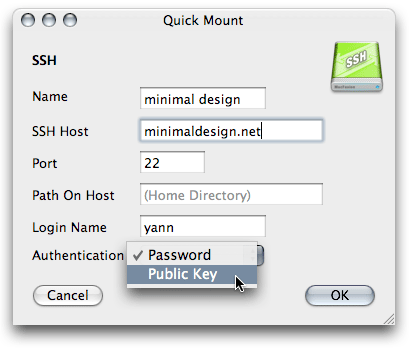
Select the Public Key authentication method
More Info: This rsync article has clear and detailed info on ssh public key authentication if you want to know more.